Understanding Resolution and Resampling
The Image Size dialog is perhaps the most important dialog box in Photoshop. This dialog contains vital information about your digital photo image and is the key to producing a quality print. The Image Size dialog not only permits you to modify image size by changing pixel dimensions, but also controls the number of pixels per inch displayed in the image. Whether you change image size, resolution, or both, the key to proper output resolution hinges on the Resample Image check box at the bottom of the Image Size dialog box.
1. First, it is important to understand that pixels are the basic building blocks of every digital photo image. Clearly defined squares of light and color data are stacked-up in rows next to one another both horizontally and vertically and look somewhat like a checkerboard pattern. Each picture element (pixel for short) has a value from 0 (solid black) to 255 (pure white), which defines 256 values for each of the RGB colors displayed in Photoshop.
2. At the heart of any digital photographic image is the rendering of a smooth, seamless gradation of tones. This gradation of tones occurs as a gradual transition of values throughout the full spectrum of colors from one color to another. Therefore, it is important to have an adequate number of pixels to output a quality photographic image.
3. Retaining a sufficient number of pixels in an image provides for adequate sharpness and detail when printed. If your image contains too few pixels, the printed image (output) appears jagged or pixilated. If you have too many pixels in the image the file size gets too large and prolongs computer processing time with no improvement in the quality of the printed image. Image resolution on the monitor is displayed in pixels per inch (ppi). In printer terminology, however, it is written in dots per inch (dpi). Essentially, ppi refers to input and dpi refers to output.
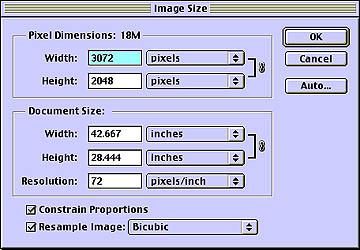
4. To check or modify an image's dimensions (height and width measured in inches) and resolution (measured in pixels per inch), choose Image >Image Size. The Image Size dialog box illustrated above shows the following: Pixel Dimensions of the image (Width and Height in pixels) and also Output Size (Width and Height, usually displayed in inches). In the same dialog box Resolution is displayed in pixels per inch (ppi), and the file size at the top of the dialog is shown in Megabytes.
5. Do not confuse image resolution (input) in Photoshop with printer resolution (output). They do not directly correlate to one another. Though your image is set at 240-300ppi, you will print that image at a setting of either 720 dpi to 1440 dpi. The numbers 720 and 1440 do not refer to the size of the image file. These numbers refer to how many "dots" of ink are placed on the paper per square inch of space. Higher dpi produces a higher print quality. It also, however, prints slower. You may have to experiment to determine what number dpi is high enough to produce a quality print, while printing in a reasonable time.
6. To print a quality photo image, a resolution of 240-300 ppi is generally optimal. It provides for a high quality print (output) without excessive data, which needlessly increases file size and inadvertently slows printing. It doesn't hurt to print a higher resolution file, but beyond a certain resolution, there is little or no increase in print quality. The increased file size simply slows down the whole printing process and consumes an excessive amount of disc storage space.
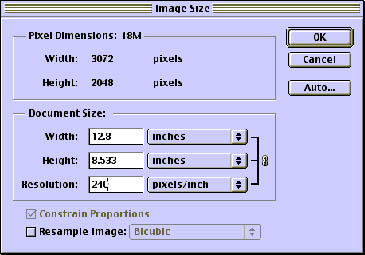
7. To modify the resolution of your image, uncheck Resample Image at the bottom of the Image Size dialog and change the resolution field to 240 ppi. Notice that the top section of the dialog indicating Pixel Dimensions did not change. The number of actual pixels remains the same and the size of the file also does not change. What does change is the Document Size, which now shows what the size of the print will be when printed at 240 ppi.
8. If the print size is too small, you can increase the Document Size of the image. Increasing the Document Size of the image, however, requires Resampling the image. Remember, upsampling adds additional pixels and downsampling subtracts pixels. Some resampling is acceptable when necessary, but it must be done with care. It is better not to downsample, but upsampling is sometimes necessary.
9. To increase image size, you can upsample, but it should be limited to a doubling of the file size (say from 6 Mb to 12 Mb). This would not appreciably degrade the final output. Upsampling more than double the file size runs the risk of compromising image quality. This is dependent, of course, on the nature of the image itself. Images with a broad tonal range and limited detail permit greater upsampling than images with very fine detail.
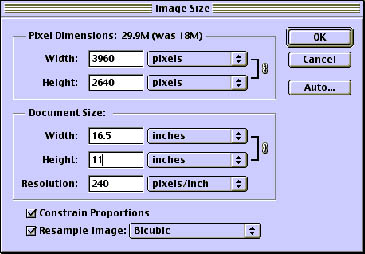
10. To upsample an image in Photoshop, check both the Constrain Proportions and Resample Image check boxes in the Image Size dialog and select Bicubic interpolation from the pop-up menu. Change the Width or Height of the image in the Document Size fields and the new file size appears at the top of the Image Size dialog box. See below.
11. Modify image dimensions until you have achieved the desired output size. Click OK to finalize the changes and then proceed to any other work on the image you would like to perform before printing.
Thanks to Professor Don Cyr and Don Eby, Southern Connecticut State University, New Haven, CT, for preparing this guide.