Create a Stepwedge in Photoshop
1. Open a new, blank file...File>New. Make sure the Mode is set to Grayscale
2. Size it to print in a 4" x 6" format for online print sevices at 240 dpi.
3. Place 100% black in the background and 100% white in the foreground of the color palate. There is a small button there to click to revert to these default settings
4. Click on the gradation tool. Use the linear gradient set to these settings:
Foreground to Background
Opacity 100%
Normal mode
5. Click and drag the cursor from one end of the frame to the other.
6. Using the rectangular marquee tool, draw out a rectangle from end to end through half of the image. Now break it into steps:
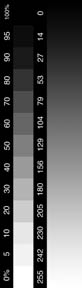
7. Choose Image>Adjust>Posterize. Enter 21 as a value, click okay. This will create a perfect stepwedge from 0 to 100% in 5% increments. If you want to create a stepwedge in 10% increments, you have to enter a value of 11. It is useful to manually add 2 extra values here though.. a 5% and a 95%.
8. Check the value of each step using the info tool... Window>Show Info
9. Be sure to label each value with the type tool. Flatten this image and save as a .jpg. Upload it to an online print service such as Ofoto or Shutterfly.com